I love summers. But it can get pretty hot in the afternoons, so enter craft time.
This adorable popsicle stick bee craft is just what I needed on one of those dose…you know the kind.
Too hot to play outside. Too tired to pull out all the stops. But my little guy still needed something fun and hands-on to keep him engaged.
So, we did what any mama and kiddo would want to do…we gathered our supplies, turned up the music, and made a mess. His little eyes light up when break out the glue and added the wiggle eyes.
It’s pure sweetness for me and this activity is still learning. If you’re looking for a quick and easy way to beat the heat while still making memories, give this cute easy summer craft a chance.
Supplies and Materials

Everything can be found at your local Dollar Store — which is perfect because I like my crafts like I like my food: cheap, cheerful, and ready in under 30 minutes.
- Wooden Craft Sticks, Jumbo – Dollar Store
- Wiggle Eyes – Dollar Store
- Chenille Stems, Black – Dollar Store
- Craft Paint – Black, Yellow, Pink
- Craft Foam – White Glitter
- Glue Gun and Glue Sticks – Dollar Store
- Sponge Dabber – Dollar Store
- Paintbrush
- Scissors
- Permanent Marker
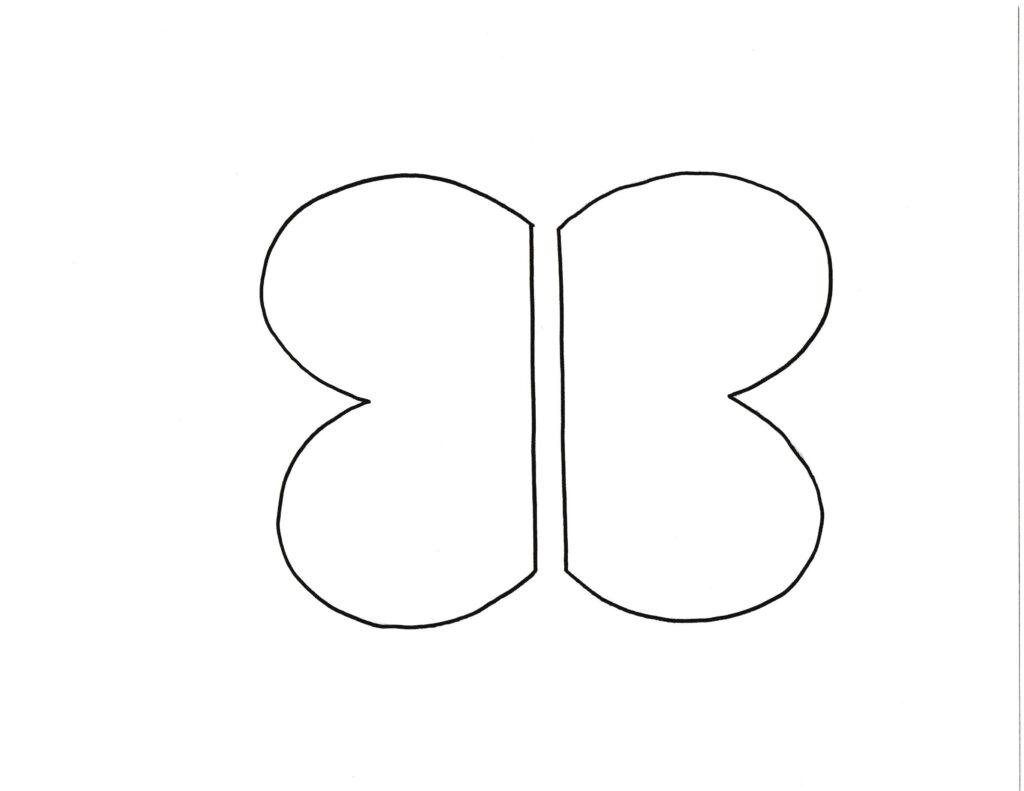
- Craft Stick Bee Patterns (Free download)
Instructions:

STEP ONE
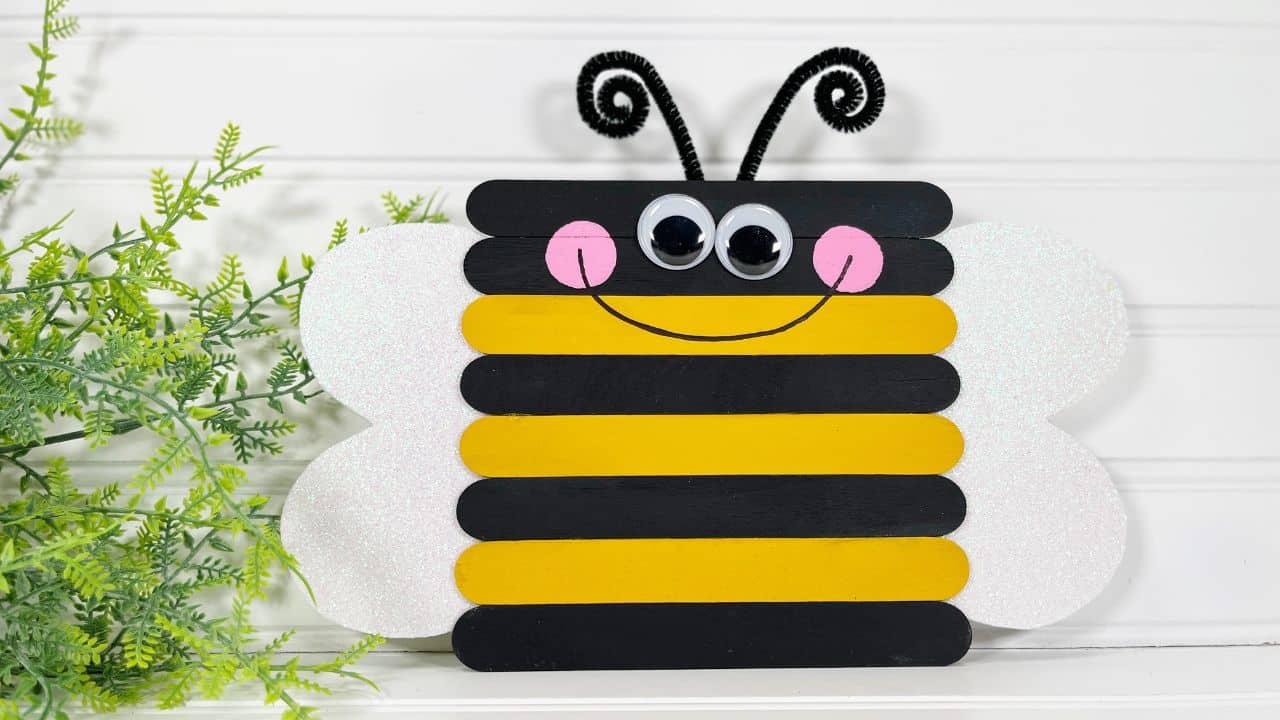
Start by gathering all your supplies—half the battle, right? Paint three jumbo craft sticks yellow on the front and sides. Let them dry, then give them another coat if needed.
STEP TWO
Next, paint five jumbo sticks black. Same thing—front, sides, and a little patience while they dry.
STEP THREE
Time to build your bee! Lay out two black sticks, then alternate yellow and black. (This is great for practicing patterns with little ones, by the way.) Trim one or two extra sticks to the bee’s width and glue them across the back to hold everything together.
TIP: If you’re not a fan of hot glue guns around kids, liquid craft glue works fine—it just takes a bit longer to set.
STEP FOUR
Glue on two wiggle eyes for that bug-eyed cuteness. Dab on some pink cheeks using your sponge and pink paint. Don’t worry if they’re a little uneven—that’s part of the charm.
STEP FIVE
Print and cut out your wing pattern. Trace it twice on the back of white glitter craft foam and cut it out.
Note: Felt or cardstock works too if you’re short on foam.
STEP SIX
Flip the bee over and glue the wings to each side.
STEP SEVEN
Now for the antennae: fold a black chenille stem in half and twist the ends into little curls. Glue it to the back top of the bee.
STEP EIGHT
Grab your marker and draw a sweet smile between the cheeks. You’re done!
This craft isn’t just cute — it sneaks in a little learning, too. From counting the stripes to practicing fine motor skills, it’s a win all around.
And if your child names their bee Buzz Lightyear, well… you know you nailed it.
Why This Is the Perfect Summer Craft

There’s a reason we keep coming back to simple crafts like this popsicle stick bee. They’re fun, quick, and full of sneaky little learning moments. It’s not just glue and paint. It’s connection.
As we painted stripes and swirled pipe cleaners into antennae, we talked about real bees: how they help flowers grow, how they make honey, and why we should be kind to them instead of scared. Even if your child is young, these little moments plant seeds—about nature, kindness, and curiosity.
You can shape conversation around:
- Patterns and counting (How many yellow stripes does your bee have?)
- Fine motor practice (Holding a brush, pinching a chenille stem, or gluing eyes on straight)
- Colors and textures (Soft moss, rough foam, sparkly wings)
- Feelings (How do you think your bee feels today with those pink cheeks?)
It’s also a great time to simply be present — no screens, no rushing. Just a few quiet minutes of creativity and fun.
Other Summer Crafts You Will Love
Frequently Asked Questions
How long does this craft take?
About 30 minutes from start to finish, including drying time. It’s quick enough to hold a toddler’s attention but still feels like a “big kid” project.
Can I use regular glue instead of a glue gun?
Yes! Craft glue works fine — just allow extra drying time. For very young kids, it’s safer and still effective.
What if I don’t have glitter foam?
No worries. You can use felt, construction paper, cardstock, or even a cereal box painted white. Just trace the wing pattern and get creative.
What age is this best for?
Ideal for ages 3–8 with some adult help. Older kids can follow the steps more independently, while little ones will love the painting and sticking parts.
Can I turn this into a magnet or wall art?
Absolutely. Just glue a magnet to the back or attach a ribbon loop to hang it on a doorknob, hook, or even a summer wreath.
What if I only have the skinny craft sticks?
You can still do the craft! Just use more sticks to create the same width or layer two rows. It might end up looking even cuter with a tiny bee twist.